
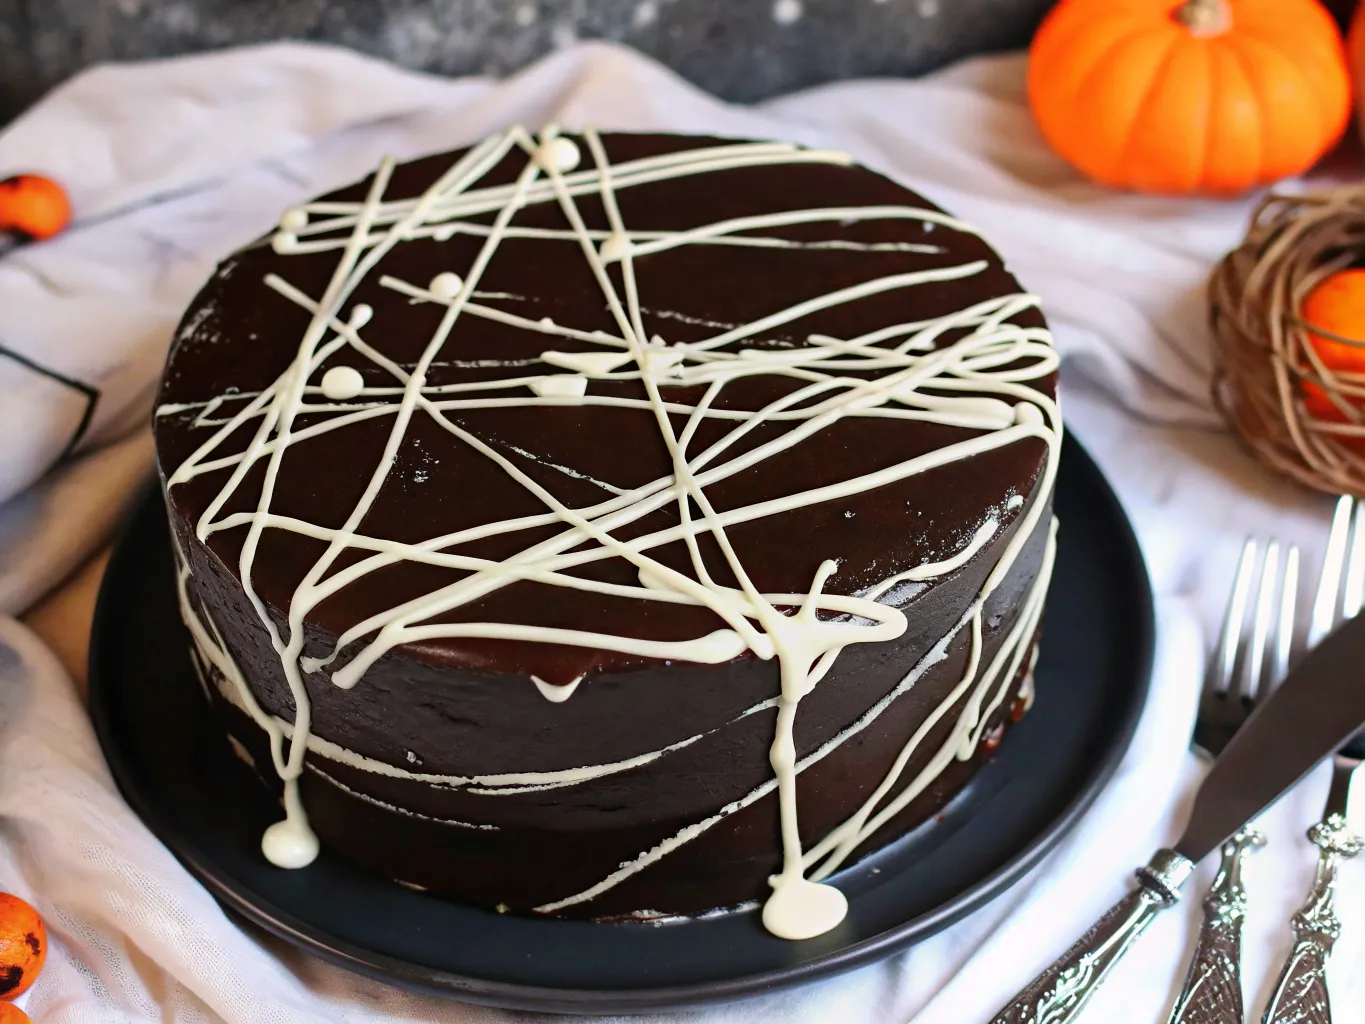
This Halloween, turn your dessert table into a spooky masterpiece with a cake that’s as delicious as it is dramatic. Picture this: rich, velvety chocolate cake layers smothered in deep black cocoa buttercream, crowned with an intricate spider web design that looks like it came straight from a haunted mansion.
This Spooky Spider Web Cake isn’t just another Halloween dessert—it’s a showstopper that combines the perfect balance of eerie aesthetics and incredible flavor. We’ve included a full video tutorial and step-by-step photos to guide you, making this impressive cake achievable for bakers of any skill level.
Whether you’re hosting a Halloween party, bringing treats to a school event, or simply want to surprise your family with something spectacular, this chocolate spider web cake recipe will become your go-to Halloween masterpiece.
Why This is the BEST Spider Web Cake Recipe
Before we dive into the nitty-gritty, let me tell you why this recipe stands out from the countless Halloween cake ideas floating around the internet:
- Foolproof & Moist: Our carefully tested chocolate cake recipe guarantees a perfect result every single time—no dry, crumbly disasters here!
- Stunning Visuals: Learn the simple trick for creating a professional-looking web design that’ll have everyone asking “How did you do that?”
- Complete Guide: From baking the cake to the final decoration, our video and photos cover absolutely everything you need to know.
- Rich & Decadent Flavor: Made with real melted chocolate and enhanced with deep, dark black cocoa buttercream that tastes as incredible as it looks.
- Beginner-Friendly: Even if you’ve never decorated a cake before, our foolproof technique makes this easy Halloween cake idea accessible to everyone.
Ingredients & Tools You’ll Need
For the Chocolate Fudge Cake:
- 1¾ cups (220g) all-purpose flour
- 2 cups (400g) granulated sugar
- ¾ cup (75g) unsweetened cocoa powder
- 2 teaspoons baking soda
- 1 teaspoon baking powder
- 1 teaspoon salt
- 2 large eggs
- 1 cup (240ml) buttermilk
- 1 cup (240ml) strong black coffee, cooled
- ½ cup (120ml) vegetable oil
- 4 oz (113g) dark chocolate, melted and cooled
Expert Note: Using both melted chocolate and cocoa powder gives this cake a deep, complex chocolate flavor that cocoa alone simply can’t match. The coffee enhances the chocolate without making it taste like coffee—trust me on this one!
For the Black Cocoa Buttercream:
- 1 cup (226g) unsalted butter, room temperature
- 4 cups (480g) powdered sugar
- ¾ cup (75g) black cocoa powder
- ½ cup (120ml) heavy cream
- 2 teaspoons vanilla extract
- ½ teaspoon salt
Expert Note: We recommend using black cocoa powder for a naturally deep black color without using excessive food gel, which can alter the taste and texture. If you can’t find black cocoa, regular cocoa powder plus black food gel works too!
For the Spider Web Decoration:
- 4 oz white chocolate, melted
- OR 2 tablespoons marshmallow fluff, warmed
Essential Tools:
- Two 8-inch round cake pans
- Electric mixer (stand or hand mixer)
- Offset spatula
- Piping bag or squeeze bottle
- Cake turntable (highly recommended!)
- Toothpick or skewer for web design
Step-by-Step Instructions
Section 1: Making the Perfect Chocolate Cake
- Prep your kitchen: Preheat oven to 350°F (175°C). Grease two 8-inch round pans and line with parchment paper.
- Mix dry ingredients: In a large bowl, whisk together flour, sugar, cocoa powder, baking soda, baking powder, and salt.
- Combine wet ingredients: In another bowl, whisk eggs, then add buttermilk, coffee, oil, and melted chocolate. Mix until smooth.
- Bring it together: Gradually add the wet ingredients to the dry ingredients, mixing until just combined. Don’t overmix—a few lumps are totally fine!
- Bake to perfection: Divide batter evenly between prepared pans. Bake for 28-32 minutes, or until a toothpick inserted in the center comes out with just a few moist crumbs.
Pro Tip: Let the cakes cool in the pans for 10 minutes before turning out onto wire racks. This prevents them from breaking apart!
Section 2: Creating the Black Cocoa Buttercream
- Cream the butter: Beat room temperature butter for 3-4 minutes until light and fluffy.
- Add the dry ingredients: Sift together powdered sugar and black cocoa powder. Gradually add to butter, alternating with cream.
- Perfect the consistency: Beat in vanilla and salt. If too thick, add more cream one tablespoon at a time. If too thin, add more powdered sugar.
The buttercream should hold its shape but spread smoothly. Think “soft serve ice cream” consistency!
Section 3: Assembling Your Masterpiece
- Level your cakes: Use a serrated knife to level the tops of both cake layers if needed.
- First layer: Place one layer on your serving plate. Spread about 1 cup of buttercream evenly across the top.
- Stack and crumb coat: Add the second layer and apply a thin layer of buttercream all around the cake. This “crumb coat” traps any loose crumbs.
- Chill time: Refrigerate for 30 minutes to set the crumb coat.
- Final frosting: Apply the remaining buttercream in a smooth, even layer. A bench scraper or offset spatula makes this much easier!
Section 4: Creating the Perfect Spider Web
Here’s where the magic happens! This technique looks complicated but is surprisingly simple:
- Prepare your web material: If using white chocolate, melt it and transfer to a piping bag or squeeze bottle. For marshmallow fluff, warm it slightly so it flows easily.
- Create the rings: Starting from the center of your cake, pipe 4-5 concentric circles about 1 inch apart. Work quickly before the chocolate sets!
- Make the web: Using a toothpick or skewer, drag lines from the center straight out to the edge, spacing them about 1 inch apart all around the cake.
- Add the alternating pattern: Between each straight line, drag from the outer edge toward the center. This creates the classic web pattern.
✨ PRO-TIP: For the cleanest lines, wipe your skewer or toothpick clean after each drag! This prevents the colors from muddying together.
Pro-Tips, Variations & Troubleshooting
Tips for Success
Room temperature is key: All your ingredients should be at room temperature for the smoothest mixing and best texture.
Don’t overmix: Once you add the wet ingredients to the dry, mix just until combined. Overmixing leads to tough, dense cake.
Level like a pro: Invest in a cake leveler or use a serrated knife with a gentle sawing motion for perfectly flat layers.
Fun Variations to Try
Orange & Black Halloween Special: Add 1 teaspoon orange extract and orange zest to your cake batter for a classic Halloween flavor combination.
Bloody Spider Web: Use red-tinted melted white chocolate instead of plain white for a gory, vampire-inspired effect.
Gluten-Free Version: Substitute the all-purpose flour with a 1:1 gluten-free baking blend (I’ve tested this with Cup4Cup and it works beautifully!).
Mini Spider Web Cupcakes: This recipe makes about 24 cupcakes—perfect for parties where individual servings work better.
Troubleshooting Common Issues
My web lines are messy: This usually happens when the chocolate is too hot or you’re working too slowly. Let white chocolate cool slightly before piping, and work in small sections.
The buttercream is too sweet: Add an extra ½ teaspoon of salt and a tablespoon of cocoa powder to balance the sweetness.
Cake layers are uneven: No worries! A generous amount of buttercream can hide a multitude of baking sins. Just spread a bit more on the thinner areas.
Frequently Asked Questions
Q: Can I make this cake ahead of time? A: Absolutely! The unfrosted cake layers can be wrapped and stored at room temperature for 2 days or frozen for up to 3 months. The finished cake stays fresh covered in the refrigerator for up to 5 days.
Q: How do I store this cake? A: Store covered at room temperature for 2-3 days or refrigerated for up to a week. Let it come to room temperature before serving for the best flavor and texture.
Q: What if I don’t have black cocoa powder? A: Use regular unsweetened cocoa powder and add black food gel until you reach your desired color. Start with a small amount—food gel is very concentrated!
Q: My spider web lines disappeared into the frosting. What went wrong? A: This happens when the buttercream is too soft or warm. Chill your frosted cake for 15-20 minutes before adding the web design, and make sure your white chocolate isn’t too hot.
Q: Can I use this technique on other cake flavors? A: Definitely! This spider web technique works on any smooth-frosted cake. Try it on vanilla, red velvet, or even funfetti for different occasions.
Happy baking, and have a wonderfully spooky Halloween!
Print
Spooky Spider Web Cake
- Total Time: 1 hour 15 minutes
- Yield: 12 servings
- Diet: Vegetarian
Description
A spooky and decadent layered chocolate cake frosted with black cocoa buttercream and decorated with a dramatic spider web design for the perfect Halloween centerpiece.
Ingredients
For the Chocolate Cake:
1¾ cups (220g) all-purpose flour
2 cups (400g) granulated sugar
¾ cup (75g) unsweetened cocoa powder
2 teaspoons baking soda
1 teaspoon baking powder
1 teaspoon salt
2 large eggs
1 cup (240ml) buttermilk
1 cup (240ml) strong black coffee, cooled
½ cup (120ml) vegetable oil
4 oz (113g) dark chocolate, melted and cooled
For the Black Cocoa Buttercream:
1 cup (226g) unsalted butter, room temperature
4 cups (480g) powdered sugar
¾ cup (75g) black cocoa powder
½ cup (120ml) heavy cream
2 teaspoons vanilla extract
½ teaspoon salt
For the Spider Web Decoration:
4 oz white chocolate, melted
OR 2 tablespoons marshmallow fluff, warmed
Instructions
1. Preheat oven to 350°F (175°C). Grease two 8-inch round pans and line with parchment paper.
2. In a large bowl, whisk together flour, sugar, cocoa powder, baking soda, baking powder, and salt.
3. In another bowl, whisk eggs, then add buttermilk, coffee, oil, and melted chocolate. Mix until smooth.
4. Gradually add wet ingredients to dry, mixing until just combined. Do not overmix.
5. Divide batter evenly between pans and bake 28–32 minutes, until a toothpick comes out with a few moist crumbs.
6. Cool cakes in pans 10 minutes, then transfer to wire racks.
7. Beat butter 3–4 minutes until light and fluffy.
8. Sift powdered sugar and black cocoa together. Gradually add to butter, alternating with cream.
9. Beat in vanilla and salt. Adjust consistency with more cream or sugar if needed.
10. Level cake layers if necessary. Place one cake layer on serving plate and spread 1 cup buttercream on top.
11. Stack the second layer and apply a thin crumb coat of buttercream. Chill 30 minutes.
12. Frost cake smoothly with remaining buttercream.
13. Melt white chocolate or warm marshmallow fluff and transfer to a piping bag.
14. Pipe 4–5 concentric circles on top of cake.
15. Drag a skewer from center outward to edge, spacing evenly around cake.
16. Between each spoke, drag from edge inward to create a spider web effect.
Notes
Expert Note: Using both melted chocolate and cocoa powder creates a deep, complex flavor. The coffee enhances the chocolate without leaving a coffee taste.
Expert Note: Black cocoa powder gives the buttercream a natural dark color without relying on food gel.
Pro Tip: Wipe your skewer clean after each drag to keep the spider web lines crisp and defined.
- Prep Time: 25 minutes
- Cook Time: 30 minutes
- Category: Dessert
- Method: Baking
- Cuisine: American