

There’s a certain magic to late summer, when the air begins to carry a whisper of autumn and fig trees are heavy with their sweet, jewel-toned fruit. Capturing that fleeting moment is what this recipe is all about. This Homemade Fig Jam is more than just a preserve; it’s bottled sunshine, a velvety, luscious spread that transforms a simple piece of toast into a gourmet experience. Forget the bland, overly sweet jellies from the store. This jam is complex, with the deep, earthy sweetness of fresh figs brightened by a splash of zesty lemon. It’s incredibly simple to make, and the aroma that will fill your kitchen is worth the effort alone. Get ready to create a pantry staple you’ll be proud of (and one that makes the most incredible homemade gift!).
Why You’ll Love This
- Incredibly Simple: With just 4 core ingredients and one pot, this recipe is perfect for beginners and seasoned canners alike.
- Pure, Intense Flavor: Making it yourself means you control the sweetness and let the true, complex flavor of the figs shine through. It’s worlds apart from store-bought versions.
- Endlessly Versatile: Sensational on toast, scones, or swirled into yogurt, but it’s also a showstopper on a cheese board, as a glaze for pork or chicken, or even as a filling for tarts.
- No Pectin Needed: Figs are naturally high in pectin, especially when combined with lemon juice, so you don’t need to add any commercial pectin for a beautiful, thick set.
Ingredients & Equipment
Key Ingredients
- 2 lbs Fresh Figs: Any variety works beautifully! Black Mission, Brown Turkey, or Kadota are all excellent choices. Look for figs that are ripe and soft but not mushy.
- 1 ½ cups Granulated Sugar: This provides the sweetness and acts as the primary preservative. You can adjust slightly based on the sweetness of your figs.
- ¼ cup Fresh Lemon Juice: This is non-negotiable! The acid is crucial for balancing the sweetness, brightening the flavor, and helping the jam set properly.
- ¼ cup Water: Helps dissolve the sugar and prevent scorching at the beginning of the cooking process.
- Optional Flavorings: A split vanilla bean, a cinnamon stick, a sprig of rosemary, or a star anise can be added during cooking for a unique twist. Remove before jarring.
Essential Equipment
- Large, Heavy-Bottomed Pot or Dutch Oven: Essential for even heat distribution and preventing the jam from scorching on the bottom.
- Wooden Spoon or Heat-Resistant Spatula: For stirring.
- Canning Jars and Lids: You’ll need about three 8-ounce (half-pint) jars. Ensure they are properly sterilized if you plan on long-term canning.
- Small Plate: Keep one in the freezer for testing the jam’s set.
- Ladle and Canning Funnel: For transferring the hot jam into jars cleanly and safely.
Step-by-Step Instructions
- Prepare the Figs: Gently wash and dry the figs. Trim off the hard stem at the top. You can leave the bottom nub. Coarsely chop the figs into quarters or smaller, depending on your preference for a chunky or smooth jam.
- Macerate the Fruit: In your large pot, combine the chopped figs, sugar, lemon juice, and water. Stir gently to coat the fruit. Let the mixture sit for 30-60 minutes at room temperature. This process, called maceration, allows the sugar to draw out the natural juices from the figs, creating a lovely syrup.
- Cook the Jam: Place the pot over medium-high heat and bring the mixture to a rolling boil, stirring occasionally. Once boiling, reduce the heat to a medium-low to maintain a steady, vigorous simmer. If you’re using optional flavorings like a vanilla bean or cinnamon stick, add them now.
- Simmer and Thicken: Let the jam simmer for 40-50 minutes, stirring every 5-10 minutes to prevent it from sticking to the bottom of the pot. As it cooks, the jam will darken in color, and the bubbles will become smaller and slower. The mixture will thicken considerably. Use your spoon to gently mash some of the fig pieces against the side of the pot if you prefer a less chunky texture.
- Test for Doneness: To check if the jam is set, perform the “wrinkle test.” Place the small plate from your freezer on the counter. Spoon a tiny amount of jam onto the cold plate and return it to the freezer for 1-2 minutes. Nudge the jam with your fingertip. If the surface wrinkles and holds its shape, it’s ready! If it’s still runny, continue cooking for another 5 minutes and test again.
- Jar the Jam: Once the jam has reached its setting point, remove it from the heat. Carefully discard any whole spices you added. Using a ladle and a canning funnel, carefully pour the hot jam into your prepared, sterilized jars, leaving about ¼-inch of headspace at the top. Wipe the rims clean, place the lids on, and screw on the bands until just “fingertip tight.”
Pro Tips
- Don’t Overcook: It’s better to slightly undercook your jam than overcook it. It will continue to thicken as it cools in the jars. Overcooked jam can become tough and overly sweet.
- Texture Control: For a smoother, more spreadable jam, use an immersion blender to pulse the mixture a few times right in the pot before jarring. For a rustic, chunky preserve, leave it as is.
- Flavor Elevations: For a sophisticated twist, stir in a tablespoon of high-quality balsamic vinegar or a splash of port wine during the last 2 minutes of cooking. This adds a wonderful depth and complexity.
- Safety First: Hot sugar is extremely hot! Be careful when cooking and jarring the jam to avoid burns. Keep kids and pets away from the stove.
Storing Leftovers
Proper storage is key to enjoying your delicious homemade jam for weeks or months to come. You have two main options:
Refrigerator Storage (Short-Term): If you don’t want to go through the full canning process, you can simply let the sealed jars cool completely on the counter. Once cool, store them in the refrigerator. This “refrigerator jam” will last for up to 3-4 weeks.
Water Bath Canning (Long-Term): For a shelf-stable jam that will last up to a year in a cool, dark pantry, you’ll need to process the jars. Place the filled and sealed jars into a large pot of boiling water, ensuring they are covered by at least 1-2 inches of water. Bring the water back to a rolling boil and process the jars for 10 minutes. Carefully remove the jars using a jar lifter and place them on a towel-lined counter to cool for 24 hours. You’ll hear the satisfying “ping” as the lids seal. Check the seals before storing.
Print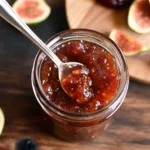
Homemade Fig Jam Recipe
- Total Time: 1 hour 10 minutes
- Yield: 3 cups
- Diet: Vegan
Description
Sweet, rich, and naturally thick, this homemade fig jam is perfect for spreading on toast, pairing with cheese, or swirling into yogurt.
Ingredients
2 pounds fresh ripe figs, stems removed and chopped
1 1/2 cups granulated sugar
1/4 cup lemon juice (about 2 lemons)
1 tablespoon lemon zest
1/2 teaspoon ground cinnamon (optional)
1/4 cup water
Instructions
1. Place the chopped figs, sugar, lemon juice, lemon zest, cinnamon (if using), and water in a large saucepan.
2. Stir everything together and let sit for 15–20 minutes to allow the figs to release their juices.
3. Turn the heat to medium and bring the mixture to a boil, stirring occasionally.
4. Reduce heat to a simmer and cook uncovered for 45–55 minutes, stirring frequently, until the jam thickens and the figs break down.
5. Use a potato masher or immersion blender for a smoother consistency, if desired.
6. Test for doneness by placing a small spoonful on a chilled plate. If it wrinkles when pushed, it’s ready.
7. Remove from heat and let cool slightly before transferring to sterilized jars.
8. Seal and refrigerate for up to 3 weeks, or process in a water bath canner for longer storage.
Notes
This fig jam pairs beautifully with cheeses like brie or goat cheese on a charcuterie board.
Add a splash of balsamic vinegar for a tangy twist.
Use very ripe figs for best flavor and natural sweetness.
- Prep Time: 20 minutes
- Cook Time: 50 minutes
- Category: Condiment
- Method: Stovetop
- Cuisine: Mediterranean