
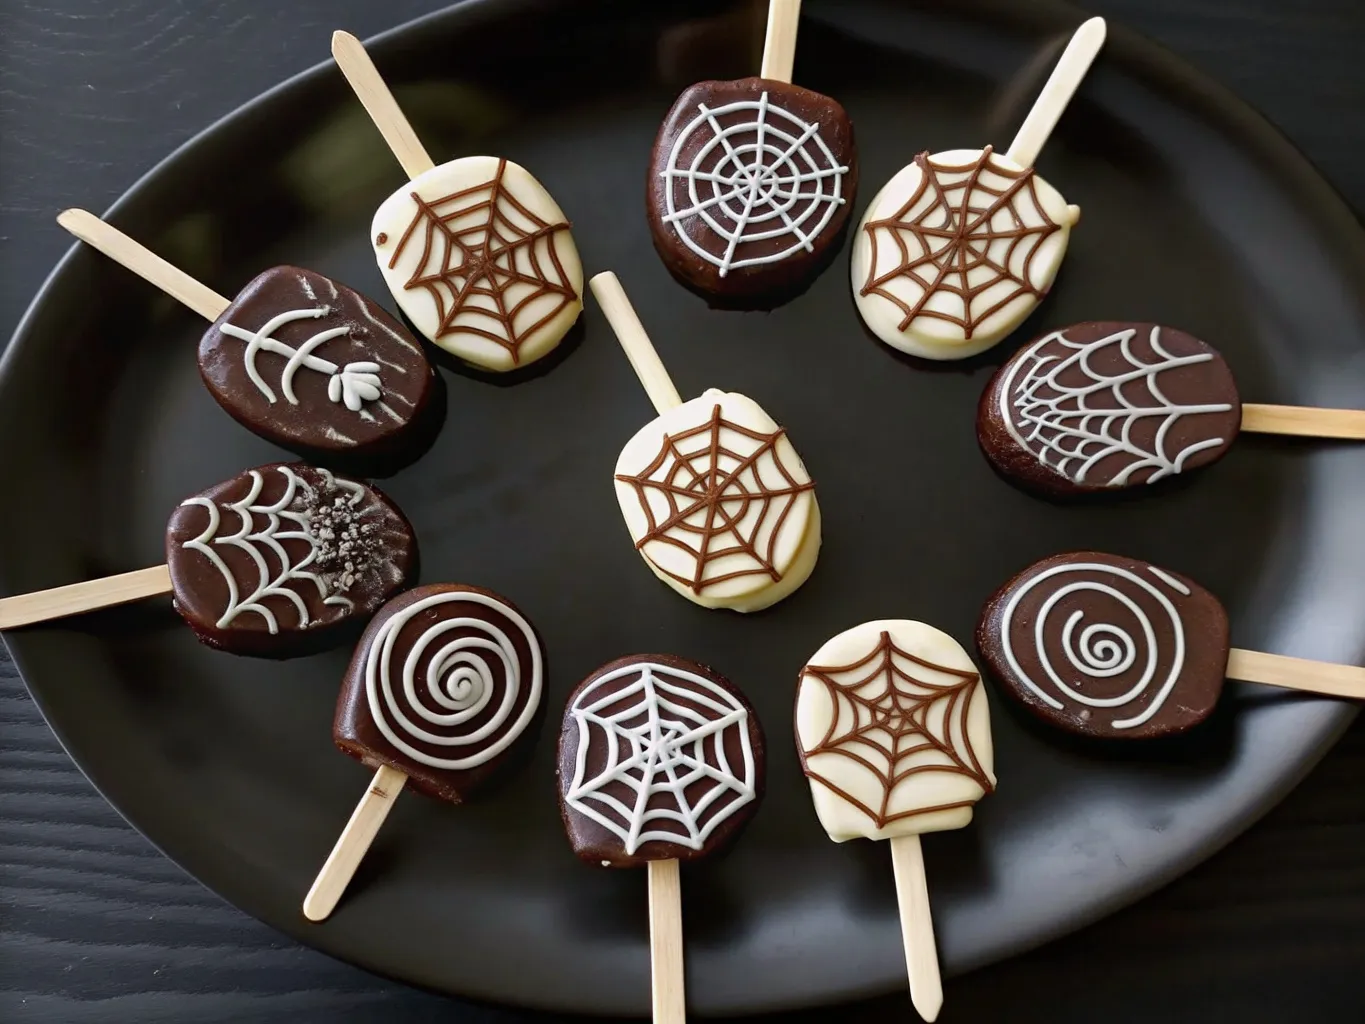
Looking for a Halloween treat that’s equal parts spooky and delicious? These Apple Spiderweb Pops are your answer! They look incredibly impressive but are surprisingly simple to make – no fancy equipment or decorating skills required.
Why You’ll Love This Recipe
Before we dive in, let me tell you exactly why this Halloween apple pops recipe is about to become your new fall favorite:
- So Easy: No baking required! If you can melt chocolate and draw circles, you can make these.
- Kid-Friendly Fun: This is the perfect kitchen project to do with children – they’ll love creating the spiderweb patterns, and you’ll love how it keeps them busy and engaged.
- Visually Stunning: They look like you spent hours on intricate decoration work, but the whole process takes less than 30 minutes.
- Completely Customizable: We’ll show you how to switch up colors, add sparkle, or even make them allergy-friendly.
- Make-Ahead Friendly: Perfect for party prep since they actually taste better after sitting for a few hours.
Ingredients You’ll Need
Getting the right ingredients is half the battle won. Here’s what you’ll need for perfect chocolate spiderweb apples:
For the Base:
- 6 medium Granny Smith apples – We recommend Granny Smith for their perfect tartness that balances the sweetness. Make sure they’re cold, clean, and completely dry (this is crucial for the caramel to stick properly).
- 1 bag (14 oz) soft caramel candies – Use store-bought caramels for ease, but if you’re feeling adventurous, homemade caramel works beautifully too.
- 2 tablespoons heavy cream – This helps create that smooth, dippable caramel consistency.
- 6 wooden lollipop sticks
For the Spiderweb Design:
- 12 oz white chocolate melting wafers – Use melting wafers or candy melts for the best results, as they set hard and don’t require tempering like regular chocolate chips.
- 4 oz black chocolate melting wafers – You can also use dark chocolate if you prefer a less stark contrast.
- 1 tablespoon coconut oil (optional) – For adjusting chocolate consistency if needed.
Essential Equipment
You probably have most of these items already:
- Medium microwave-safe bowls (2)
- Piping bags or small zip-lock bags
- Toothpicks
- Parchment paper
- Large baking sheet
- Apple corer (optional but helpful)
How to Make Apple Spiderweb Pops
Now for the fun part! Here’s how to create these spooky masterpieces step by step:
Step 1: Prep Your Apples
Wash your apples thoroughly and dry them completely – I mean completely. Even a tiny bit of moisture will make your caramel slide right off. Remove any waxy coating by rubbing with a paper towel. Insert the lollipop sticks firmly into the stem end, pushing them about 2/3 of the way through the apple.
Step 2: Create the Caramel Base
Unwrap your caramels (pro tip: get the kids to help with this tedious task!) and place them in a microwave-safe bowl with the heavy cream. Microwave in 30-second intervals, stirring between each, until smooth and creamy. This usually takes about 1.5-2 minutes total.
Step 3: Dip Those Apples
Working quickly while the caramel is warm, dip each apple into the caramel, twirling to coat evenly. Let excess caramel drip off, then place on parchment-lined baking sheet. Don’t worry if they’re not perfectly smooth – rustic looks great too! Let them set for about 10 minutes.
Step 4: Prepare Your Chocolate
Melt the white chocolate in a microwave-safe bowl, stirring every 30 seconds until smooth. In a separate bowl, melt the black chocolate the same way. If either chocolate seems too thick for easy drizzling, add a tiny bit of coconut oil – never water, which will cause the chocolate to seize up.
Step 5: Create the White Chocolate Base
Dip each caramel apple into the white chocolate, letting excess drip off. Place back on parchment paper, but don’t let them set completely – you want the white chocolate still slightly wet for the next step.
Step 6: Master the Spiderweb Magic
Here’s where the magic happens! Transfer your black chocolate to a piping bag or zip-lock bag with a tiny corner snipped off. Starting from the center of each apple, pipe concentric circles about 1/2 inch apart.
Now here’s the secret: take a toothpick and drag it from the center circle to the outer edge, creating “spokes.” Alternate the direction – drag from center to edge, then from edge to center – to create that authentic spiderweb pattern. Work quickly while the chocolate is still wet!
Pro Tips for Perfect Spiderweb Pops
After making dozens of these beauties, here are my hard-learned secrets for success:
Tip 1: The Secret to Dry Apples
Even organic apples often have a waxy coating that prevents caramel from sticking. If your caramel keeps sliding off, try dipping the cleaned apples briefly in boiling water, then immediately into ice water. Dry thoroughly – this removes any remaining wax.
Tip 2: Getting the Right Chocolate Consistency
If your chocolate is too thick for easy piping, add a tiny bit of coconut oil or shortening – never water! Start with just 1/4 teaspoon and mix well. The chocolate should flow smoothly but not be so thin that your circles spread out.
Tip 3: Work Quickly But Don’t Rush
The spiderweb design works best when the white chocolate is still slightly wet, but you don’t want to panic. Have your black chocolate ready to go before you start dipping in white chocolate. If the white chocolate starts to set before you finish your web, just pop the apple back in the refrigerator for 2 minutes to firm up, then re-dip the top in white chocolate.
Tip 4: Perfect Your Technique
Practice the spiderweb pattern on parchment paper first! Pipe circles, then drag with a toothpick. Once you get the rhythm down, you’ll be creating perfect webs every time.
Variations to Try
Once you’ve mastered the basic Apple Spiderweb Pops Recipe, why not get creative?
Dark & Mysterious
Use dark chocolate as your base instead of white, then create the web with white chocolate. This creates a more sophisticated, less sweet version that adults especially love.
Spooky Color Combinations
Add food coloring to your white chocolate to create orange, green, or purple bases. Orange with black webs screams Halloween, while purple with silver webs (using luster dust) looks elegantly spooky.
Nut-Free Version
Make sure to use certified nut-free chocolate melts if you’re serving these at school events or have allergy concerns. Enjoy Life and Guittard both make excellent nut-free options.
Add Some Sparkle
Before your chocolate sets completely, sprinkle on some edible glitter, Halloween sprinkles, or even finely chopped toasted coconut for texture. Just remember – less is more with decorative elements.
Mini Version
Use small apples or even apple slices on shorter sticks for bite-sized treats perfect for younger kids or party appetizers.
Storage and Make-Ahead Tips
These Halloween apple pops are actually better when they have time to set properly:
Storage: Keep them in the refrigerator in a single layer, loosely covered with plastic wrap. They’ll stay fresh for up to 4 days, though the apples are crispest within the first 2 days.
Make-Ahead Magic: You can complete these up to 2 days before your event. The flavors actually improve as they meld together. Just bring them to room temperature about 30 minutes before serving for the best texture.
Freezer Option: These don’t freeze well due to the apple’s high water content, which creates ice crystals that affect texture.
Recipe FAQ
What are the best apples for this recipe?
Granny Smith apples are my top choice because their tartness balances the sweet caramel and chocolate beautifully. They’re also firm and hold up well to the dipping process. Honeycrisp and Gala apples work well too if you prefer sweeter varieties.
My caramel keeps sliding off the apple. Why?
This usually happens when there’s moisture or wax on the apple surface. Make sure to wash and completely dry your apples, then rub them with a paper towel to remove any waxy coating. Some people find that briefly dipping the apples in boiling water, then ice water, and drying thoroughly helps remove stubborn wax.
Can I use regular chocolate chips instead of melting wafers?
While you can use chocolate chips, melting wafers work much better for this recipe. They’re specifically designed to melt smoothly and set up hard without tempering. If you only have chocolate chips, add a tablespoon of coconut oil or shortening to help with consistency.
How do I make a neat spiderweb design?
The key is working while your white chocolate base is still slightly wet. Pipe your circles from the center outward, keeping them evenly spaced. When dragging your toothpick, use smooth, confident strokes and alternate directions – center to edge, then edge to center.
Can I make these without caramel?
Absolutely! You can skip the caramel layer and go straight to dipping in chocolate. The spiderweb technique works just as well on plain chocolate-covered apples. You might want to add a bit more texture with chopped nuts or sprinkles in this case.
There you have it – everything you need to create stunning chocolate spiderweb apples that’ll be the talk of your Halloween celebration. The best part? Once you try these, you’ll realize how simple it is to create something that looks incredibly professional.
Remember, the key to success is preparation and patience. Get all your ingredients ready, work in stages, and don’t be afraid to practice the spiderweb technique a few times. Before you know it, you’ll be creating these spooky masterpieces like a pro.
So grab those apples and let’s get started – your Halloween guests are going to be absolutely amazed!
Print
Apple Spiderweb Pops
- Total Time: 30 minutes
- Yield: 6 apple pops
- Diet: Vegetarian
Description
Fun, spooky, and delicious, these Apple Spider Web Pops are tart Granny Smith apples dipped in caramel and white chocolate, then decorated with eerie black chocolate spiderwebs. Perfect for Halloween parties or festive fall treats!
Ingredients
For the Base:
6 medium Granny Smith apples – We recommend Granny Smith for their perfect tartness that balances the sweetness. Make sure they’re cold, clean, and completely dry (this is crucial for the caramel to stick properly).
1 bag (14 oz) soft caramel candies – Use store-bought caramels for ease, but if you’re feeling adventurous, homemade caramel works beautifully too.
2 tablespoons heavy cream – This helps create that smooth, dippable caramel consistency.
6 wooden lollipop sticks
For the Spiderweb Design:
12 oz white chocolate melting wafers – Use melting wafers or candy melts for the best results, as they set hard and don’t require tempering like regular chocolate chips.
4 oz black chocolate melting wafers – You can also use dark chocolate if you prefer a less stark contrast.
1 tablespoon coconut oil (optional) – For adjusting chocolate consistency if needed.
Essential Equipment:
Medium microwave-safe bowls (2)
Piping bags or small zip-lock bags
Toothpicks
Parchment paper
Large baking sheet
Apple corer (optional but helpful)
Instructions
1. Wash your apples thoroughly and dry them completely – even a tiny bit of moisture will make your caramel slide right off. Remove any waxy coating by rubbing with a paper towel. Insert the lollipop sticks firmly into the stem end, pushing them about 2/3 of the way through the apple.
2. Unwrap your caramels and place them in a microwave-safe bowl with the heavy cream. Microwave in 30-second intervals, stirring between each, until smooth and creamy (about 1.5-2 minutes total).
3. Working quickly, dip each apple into the caramel, twirling to coat evenly. Let excess caramel drip off and place on a parchment-lined baking sheet. Let them set for about 10 minutes.
4. Melt the white chocolate in a microwave-safe bowl, stirring every 30 seconds until smooth. In a separate bowl, melt the black chocolate the same way. Add a small amount of coconut oil if needed to loosen the texture.
5. Dip each caramel apple into the melted white chocolate, letting excess drip off. Place back on parchment paper while the chocolate is still slightly wet.
6. Transfer black chocolate to a piping bag or zip-lock bag with a snipped corner. Pipe concentric circles starting from the center of each apple.
7. Use a toothpick to drag lines from center to edge, alternating directions to create a spiderweb effect. Work quickly before the chocolate sets.
Notes
These pops are best enjoyed the same day, but can be stored in the refrigerator for up to 24 hours. For a cleaner spiderweb look, keep your hands and work surface cool and dry. Kids will love helping with the piping and dragging steps!
- Prep Time: 20 minutes
- Cook Time: 10 minutes
- Category: Dessert
- Method: No-Bake
- Cuisine: American